|
|
Photographing
Snowflakes
... A How-To Guide ... |
|
Photographing snowflakes can be great fun and a rewarding hobby.
It is a quiet, contemplative activity that takes you outdoors on snowy
days to examine and record some of Nature's most stunning artistry.
Best of all, each picture you take will be different from all others,
because each snow crystal is unique.
Unfortunately, snowflake photography is not cheap, and
it requires that you to spend some quality time outside in the
cold. But if snowmobiling (which is also mighty cold and
expensive) is not for you, then you may want to give snowflake
photography a try.
Before spending a lot of money on photographic equipment, I suggest that
you first try some basic
snowflake watching. Carry a small magnifier around in your
pocket for a little while and see what the crystals look like where you
live. If you like what you see and want to go further, then
consider buying a
microscope or going full-on and building your own snowflake
photography set-up. |
|
A Snowflake Photography Kit |
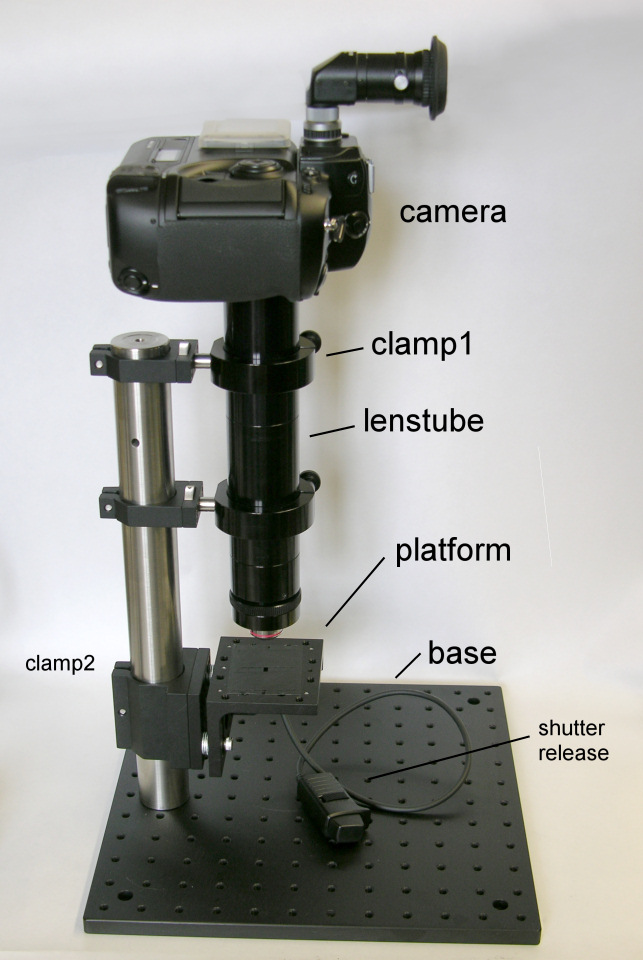
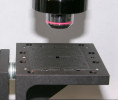
 In this section I give detailed instructions for building your own
snowflake photo-microscope, shown at right. A full parts list is
included, and you can build everything on your living room table with no
extra tools or previous experience. All that's needed is a loaded
credit card and some free time. With this set-up, you can take
pictures that are as good as those in my
photo galleries (or close to it, anyway).
In this section I give detailed instructions for building your own
snowflake photo-microscope, shown at right. A full parts list is
included, and you can build everything on your living room table with no
extra tools or previous experience. All that's needed is a loaded
credit card and some free time. With this set-up, you can take
pictures that are as good as those in my
photo galleries (or close to it, anyway).
Alas, the hardware is rather expensive.
Photography is generally an expensive hobby, and micro-photography is
even worse. But if you compare the price tag with what you have to
spend on a snowmobile, or even for a single weekend of skiing, it isn't
so bad. Also, the equipment will last for many years, so you can enjoy
photographing snowflakes long after you've forgotten what you paid for
the hardware.
If you set out to build this instrument, I recommend
that you print out this page along with the important pictures.
I'm constantly changing the website, and I cannot guarantee that this
page will be here tomorrow. I also recommend that you pick up a
copy of my
Field Guide to Snowflakes. This book has lots of valuable
information about snow crystals and how to photograph them. |
Parts List:
Aside from the camera, the rest of the parts
can be ordered online from Edmund
Optics, ThorLabs, and
McMaster-Carr. If you try
ordering from this list and find any errors, please send me a
e-mail. |
Parts -- The
Camera This you must supply yourself. The only real
requirement is that it be an SLR (single-lens reflex) camera body with a
removable lens. I find digital is much superior to film, but film
will work also. If you change cameras in the future, the rest of
the hardware will require little or no modification.
If you don't already have a camera, I recommend the Nikon D50, which is
a high-quality, reasonably affordable 6-megapixel digital camera.
(See Steve's Digicams for
reviews of this and many other cameras.) (The camera in the
picture above is a Nikon D1X, in case you're interested.)
Cost for Nikon D50: about $650 online.
WARNING: Cameras are not designed to work in below freezing
temperatures, so I recommend that you keep your camera warm at all times. This
is important! If your camera freezes and breaks, don't say I
didn't warn you. More on this below. |
Parts -- Lens
Tube:
Edmund #52-296 100 mm T-mount
extension tubes (order two)
(for a 35-mm film camera, order three tubes) |
$ 38.50
(prices as of 10/2006)
$ 38.50 |
Edmund #42-835 T-mount to camera
adaptor
(this is for a Nikon camera -- pick an adaptor to match
your camera) |
$ 29.00 |
| Edmund #52-300 Focus Tube |
$ 66.10 |
| Edmund #52-301 T-mount to
microscope objective adaptor |
$ 27.50 |
| ThorLabs #RMS4X microscope
objective |
$172.00 |
| Cost of the lens tube: |
subtotal $371.60 |
|
Parts -- Base
Plate and mounting hardware:
| ThorLabs #MB12 12"x12" aluminum
breadboard |
$162.00 |
| ThorLabs #P14 post |
$ 74.00 |
| ThorLabs #C1500 compact post
clamp (order two) |
$ 59.00
$ 59.00 |
| ThorLabs #AS8E25E thread adaptor
(order two) |
$ 3.90
$ 3.90 |
| Edmunds #52-304 T-mount ring
(order two) |
$ 60.00
$ 60.00 |
| ThorLabs #C1501 mounting post
clamp |
$ 58.00 |
| ThorLabs #CAM1 right angle plate |
$ 89.00 |
| ThorLabs #BD-3/16 wrench |
$ 4.60 |
| McMaster-Carr #92313A537
1/4-20x0.5 SS set screws |
$ 5.88 (for 25) |
| McMaster-Carr #92185A541
1/4-20x7/8 SS socket head cap screws |
$ 6.04 (for 10) |
| McMaster-Carr #90313A203 1/4
washers |
$ 7.81 (for 50) |
| Cost of the base plate and
mounting hardware: |
subtotal $653.13 |
|
The grand total is
$650 (camera) + $372 (lens tube) + $651 (base plate) = $1673 (plus tax,
shipping, etc.). And you'll need a computer to work with the
digital photographs. If you already own a 35mm film camera, then
you need only buy the lens tube and base plate, which cost $1060, and
you won't need the computer.
Even better, If you have some wood-working
experience (or know someone who does), and are willing to improvise,
then you could save $650 by building
your own base plate assembly. In that case, you would need to build
some kind of structure that will rigidly support the camera, lens
tube, and a platform to hold the snow crystals. How you might do
that is up to you.
The above kit is intended for someone with no previous
hardware experience -- every nut and bolt is provided, and everything
can be assembled without additional tools. |
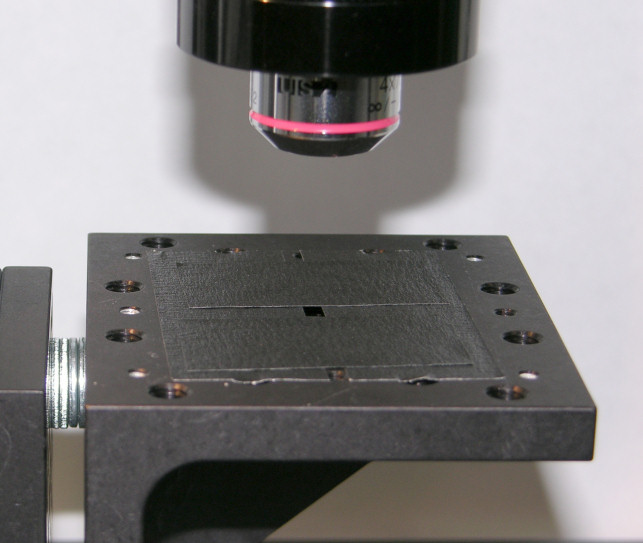
Assembly:
Putting the parts together is fairly straightforward.
The lens tube simply screws together by hand. From top to bottom,
it consists of the camera, camera adaptor, two 100 mm tubes, the focus
tube, microscope adaptor, and the microscope objective. Assembling
the lens tube takes all of five minutes.
Using two 100 mm tubes works well with most Nikon
digital SLRs, where the sensor size is roughly 1.5 times smaller than
35mm film. If you are using a 35mm film camera, use three 100mm
tubes together to get the same field of view (more on this below).
 For the rest of the assembly, refer to the picture of the final
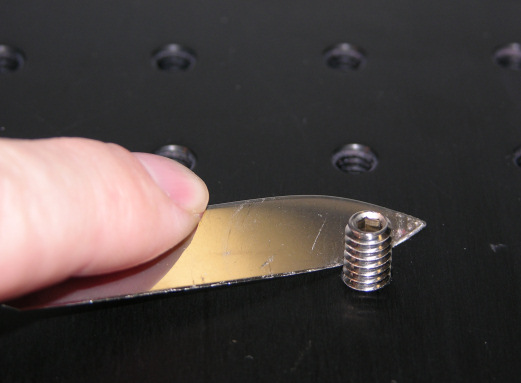
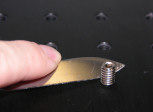
instrument above. Start by setting the MB12 breadboard on a level
surface. Put a set screw in the hole of your choice, and screw it
in by hand so that half of the screw is in the breadboard. While
using a knife to keep the set screw from turning (see picture at right),
screw the P14 post onto the set screw. When this is done, half of
the set screw should be in the base plate while the other half is in the
post. Tighten the post firmly by hand, and give it a good shake to
make sure it is secure.
For the rest of the assembly, refer to the picture of the final
instrument above. Start by setting the MB12 breadboard on a level
surface. Put a set screw in the hole of your choice, and screw it
in by hand so that half of the screw is in the breadboard. While
using a knife to keep the set screw from turning (see picture at right),
screw the P14 post onto the set screw. When this is done, half of
the set screw should be in the base plate while the other half is in the
post. Tighten the post firmly by hand, and give it a good shake to
make sure it is secure.
Next attach the mounting post clamp (C1501) to the post
using the wrench (BD-3/16) (clamp2 in the picture). Don't attach
the right angle plate yet.
Next attach the two tube clamps (labeled clamp1 in the
picture) to the post. Each clamp consists of a C1500 compact post
clamp, a AS8E25E thread adaptor, and a 52-304 mounting ring. The
parts screw together by hand, and you use the wrench to attach each
clamp to the post. This also takes about five minutes.
Next put the lens tube into the two clamps and secure
them. You should remove the camera and microscope objective before
doing this step, so you don't break anything, or scratch the optics,
etc. You will also have to take the focus tube off so the tube
assembly fits into the clamps. You will have to loosen the clamps
and the post clamps to get it to fit together, but it works. Make
sure the tube clamps are tight (by hand), so the lens tube is secure.
 Next attach the right angle plate using some washers and 7/8" long
socket cap screws (see picture at right). Put enough washers in so
the hole in the right angle plate is centered with respect to the
microscope objective. Be careful not to scratch the optics during
this step.
Next attach the right angle plate using some washers and 7/8" long
socket cap screws (see picture at right). Put enough washers in so
the hole in the right angle plate is centered with respect to the
microscope objective. Be careful not to scratch the optics during
this step.
The whole assembly should take less than a hour, and
the final instrument should look like the picture above.
|
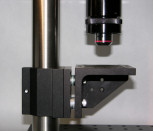
 To start using the microscope, place a piece of printed paper on the
platform, shine a bright light on the paper, and look through the camera
eyepiece (you do not need the right-angle eyepiece shown in the overall
picture above). Move the platform up or down (using the post
clamp) until the paper comes roughly into focus. Fine adjustment
of the focus is done using the Focus Tube. If you see some highly
magnified print on the paper, then hooray -- it all works, and you're ready
to start taking some pictures.
To start using the microscope, place a piece of printed paper on the
platform, shine a bright light on the paper, and look through the camera
eyepiece (you do not need the right-angle eyepiece shown in the overall
picture above). Move the platform up or down (using the post
clamp) until the paper comes roughly into focus. Fine adjustment
of the focus is done using the Focus Tube. If you see some highly
magnified print on the paper, then hooray -- it all works, and you're ready
to start taking some pictures.
Of course, I recommend you play around with the
hardware indoors where it's pleasant before venturing outside in the
cold to photograph snowflakes. Use bits of clear plastic as
surrogate snowflakes for practice (remember that ice is clear and
colorless). For illumination, it's best to shine light up through
the snow crystals from below. One way is to shine a bright light
on a white card under the platform (see picture at right). Be
careful not to apply too much heat near the platform, however, since
snowflakes can melt or evaporate away quickly.
There is much to say about illumination; using a
light and white card is just a quick way to get started. When you
become serious about it, the quality of your snow crystal photographs
depends to a large extent on how well you do the lighting. More on
this below. |
Keeping Your
Camera Warm
Before you go outside to photograph snowflakes, I
recommend that you keep your camera above 32F (0C) at all times. Your manual probably has a
line buried inside saying how the camera is only designed for use above
40 F or so. That little disclaimer means that if your camera
freezes and breaks as a result, then the warranty is voided and the
manufacturer will not give you a refund or replacement. This is
one of the hazards of snowflake photography, so it's up to you to
keep your camera warm. On the other hand, be careful not to
overheat your camera. Temperature extremes in either
direction could wreck your camera.
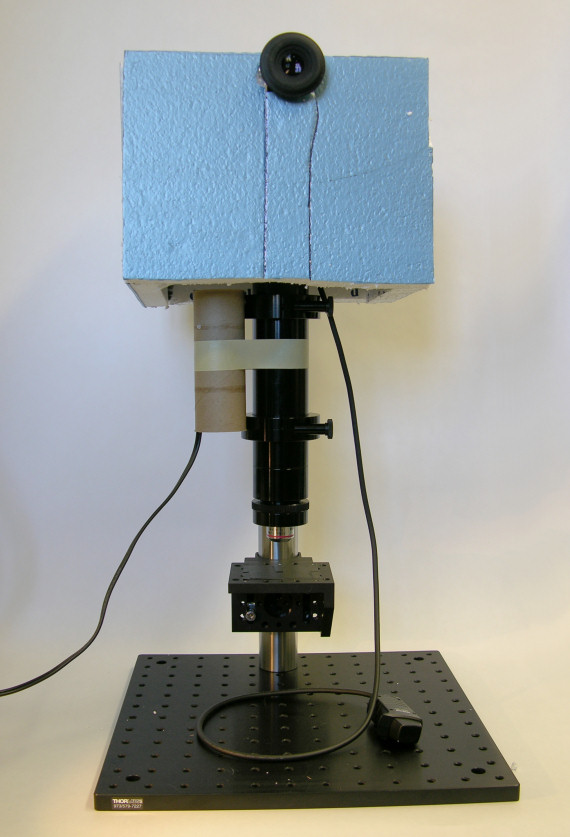
 One easy and effective heating technique is
to place an inverted styrofoam box over the camera and apply some heat
underneath, as shown at right. I built this box out of 1"
styrofoam sheet held together with silicone caulk (both are available at
most hardware stores). I also mounted a 20W light bulb inside a
cardboard tube and taped it to the lens assembly (see picture). I
wrapped the bulb in aluminum foil so no scattered light gets into the
camera.
One easy and effective heating technique is
to place an inverted styrofoam box over the camera and apply some heat
underneath, as shown at right. I built this box out of 1"
styrofoam sheet held together with silicone caulk (both are available at
most hardware stores). I also mounted a 20W light bulb inside a
cardboard tube and taped it to the lens assembly (see picture). I
wrapped the bulb in aluminum foil so no scattered light gets into the
camera.
When the lamp is on, the heat it generates rises and is
trapped inside the styrofoam box, where it keeps the camera warm.
Note that with the shutter release cable and right-angle eyepiece, as
shown in the picture, I can use the camera with the box in place. I
did some tests and found that the inside of the box was about 40-50
degrees F warmer than ambient. So at 30F, the camera is no warmer
than 80F, which is okay. At 0F, the camera is no cooler than 40F,
which is also acceptable. I recommend that you put a thermometer
inside the box and keep an eye on the temperature, since you don't want
to take any chances with your camera.
Heating your camera this way is a pain in the neck, and
it gets in the way of taking pictures. Maybe your camera will work
fine at low temperatures. I always keep my camera above freezing,
and I don't know what will happen to your camera in the cold.
Another handy tip is to put
your camera in a zip-lock plastic bag before bringing it inside from the
cold. The bag will keep condensation off your camera. Once the camera warms up, you can
take it out of the bag. |
 Miscellaneous Miscellaneous
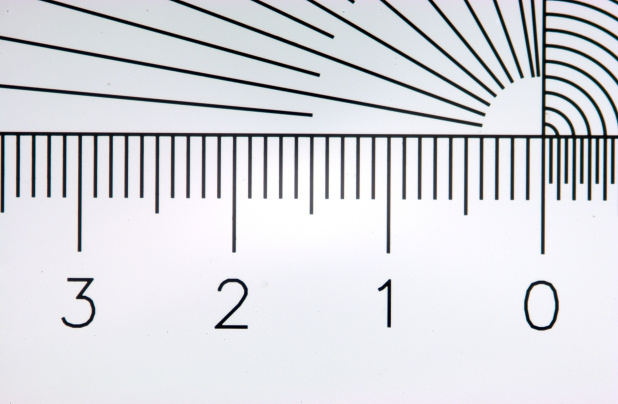
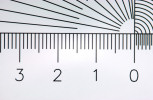
If you take a picture of a clear ruler (here a
reticle like Edmund #56-352) with this instrument, you will get
something similar to that at right. The numbers are millimeters,
so the field-of-view is about 2.5x4 mm, which is a reasonable choice for
snowflake photography. If you want to change the field-of-view (or
equivalently, the magnification), use more or fewer extension tubes.
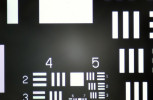
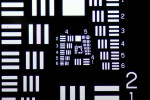
You may have noticed that the reticle picture is
brighter in the center than around the edges. The excess
brightness is more easily seen when taking a picture of a resolution
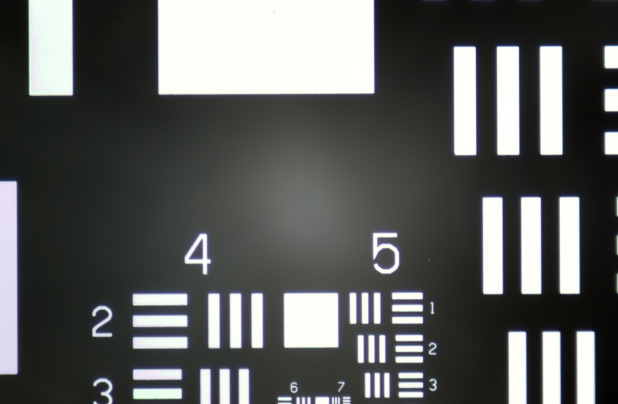
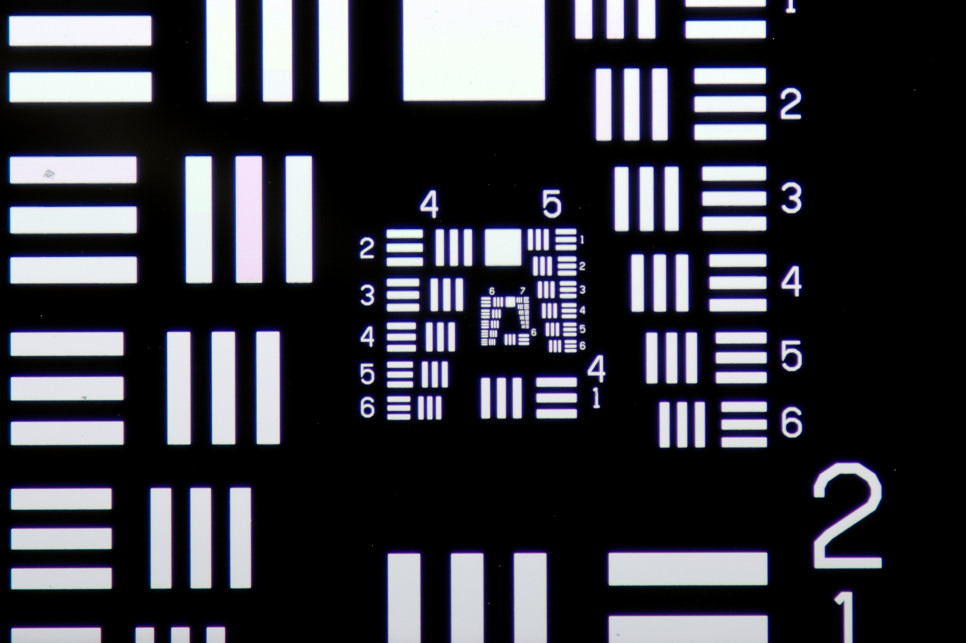
target (Edmund #38-256), as in the first picture below. Note the
brighter haze in the center of the picture. The source of this
extra brightness is light that scatters around inside the lens tube, and
it tends to give your pictures a washed out look. The fix is to
add a "field stop", as shown in the second picture below. Here I
just added some black tape outside the field of view of the microscope,
which blocks all but the light you want. As you can see in the
third picture below, the excess brightness is gone and the image has a
higher contrast than the first.
When you start taking
pictures with this instrument, you will notice that the threads of the
Focus Tube are a bit sloppy. You can fix this by taking it apart
and putting a bit of Vaseline on the threads. Don't use too much,
however, or it will be difficult to focus in the cold. You can put
the Focus Tube in your freezer (take the microscope objective off first,
so you don't scratch it) to see how easily it will turn when it's cold. |
Photographing
Once you are happy with the performance of your
snowflake microscope, you're ready for the real thing. I recommend
setting it up on a bench inside your garage, or in some other unheated
outdoor building, if you have one. You can even leave your camera
attached, provided you always leave the heater on. (If you detach
the camera, cover the lens tube to keep dust out, and always keep a lens
or cover on your camera.)
If you keep your snowflake photo-microscope set up in
your garage, then it will always be cold and ready, so you can start
photographing whenever you see some nice snow crystals. This will
also keep it under shelter, so falling snow doesn't get into everything. |
| Snow
Crystal Handling |
 Another challenging aspect of snow
crystal photography is handling. Snow crystals are small, somewhat fragile, and they melt
away with the slightest breath. The crystals also tend to
evaporate away or melt once they're under the lights of the microscope.
This means you only have a few minutes to bring the crystal into view and compose the shot. Another challenging aspect of snow
crystal photography is handling. Snow crystals are small, somewhat fragile, and they melt
away with the slightest breath. The crystals also tend to
evaporate away or melt once they're under the lights of the microscope.
This means you only have a few minutes to bring the crystal into view and compose the shot.
A good strategy for handling larger snow
crystals is to first catch them as they fall on some convenient cold
flat surface. Any dark-colored cardboard surface works well, and I
find blue foam-core is nearly ideal. Scan the board for
interesting crystals, and brush the flakes off regularly. When you
spot a good one, carefully pick it up using a tiny paintbrush (say 1mm
diameter brush, with a sharp tip) and place it on a
clean microscope slide. Place the slide under your microscope and
take the picture.
Temperature matters a lot. If it's just a few degrees below
freezing, snowflake photography is difficult. The crystals melt
almost as soon as you look at them. When it's colder, the crystals are easier to handle
and they last longer, giving you more time to compose. I get my
best pictures when the temperature is around -15 C (5 F), which is where
stellar plates form (see the
Morphology Diagram).
Another technique I like is to simply let snowflakes fall on clean
microscope slides. Support 2-8 slides by their edges so you don't
get icy glop on the lower surfaces. When a slide has a nice
dusting of snow, put it under the microscope and scan around for nice
crystals. When you've seen what one slide has to offer, wipe it
off, place it back outside, and pick up another. I've taken many
excellent pictures of smaller snow crystals using this simple technique. |
|
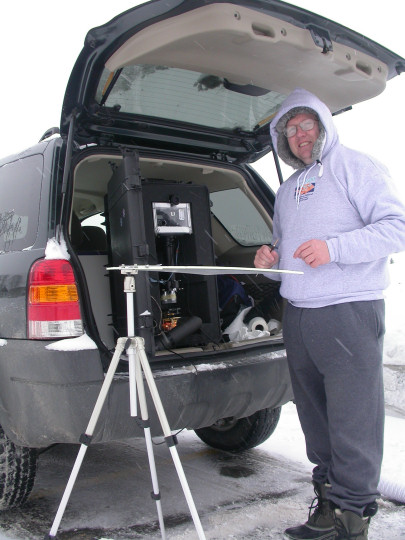
The SnowMaster 9000 |
People
often ask me how I took the pictures in the
Photo Galleries, so let's take a look at my setup, which I call the
SnowMaster 9000. I tend to use expensive
components to get the very best pictures, so this is something of a
deluxe approach to snowflake photography.
 When I first
began toying with the idea of writing a book about snowflakes (see
Snowflake Books for the results), I found that there weren't any really nice pictures
out there (in my opinion, anyway). The state-of-the-art in
snowflake photography was not what it could have been. This was an
opportunity, so I set out to design and build a photo-microscope that was
optimized for taking pictures of snowflakes. When I first
began toying with the idea of writing a book about snowflakes (see
Snowflake Books for the results), I found that there weren't any really nice pictures
out there (in my opinion, anyway). The state-of-the-art in
snowflake photography was not what it could have been. This was an
opportunity, so I set out to design and build a photo-microscope that was
optimized for taking pictures of snowflakes.
There are a number of challenges in photographing
snowflakes. The crystals are small, so the usual techniques of
macro photography don't work well; what you need is essentially a
high-quality, low-power microscope. In addition, the equipment
must be robust enough to work outside, and it has to withstand
sub-freezing temperatures. Finally, to take good pictures, you
have to take a lot of pictures. Therefore, I wanted my hardware to
be easy to set up and use.
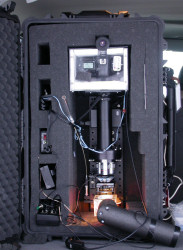
The eventual result of my design efforts is the
snowflake camera shown at right. The camera itself is housed in a heated enclosure
(the white styrofoam box in the picture) so that it can stay outside in
the cold indefinitely. The whole assembly is mounted in an
instrument case so I can take it on an airplane (since there aren't many
snowflakes to photograph here in Southern California). Finally, I
put some effort into illumination techniques, mainly the use of
transmitted light tailored by a variety of color filters for different
effects. |
|
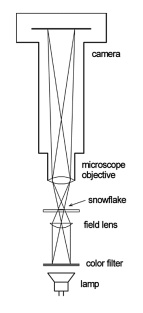 The overall layout for my setup is shown at left. My camera is a
Nikon D1X, which was a good choice five years ago when I bought it.
Digital is much better than film for snowflake photography, in my
opinion -- digital pictures are less grainy than film, the overall image
quality is better, it's easier to take lots of pictures, you can check
the pictures as you take them, you can easily do post-processing, etc.
I find that my camera is actually not such a limiting factor, but
nevertheless I intend to move up to a 10-12 megapixel camera one of
these days.
The overall layout for my setup is shown at left. My camera is a
Nikon D1X, which was a good choice five years ago when I bought it.
Digital is much better than film for snowflake photography, in my
opinion -- digital pictures are less grainy than film, the overall image
quality is better, it's easier to take lots of pictures, you can check
the pictures as you take them, you can easily do post-processing, etc.
I find that my camera is actually not such a limiting factor, but
nevertheless I intend to move up to a 10-12 megapixel camera one of
these days.
I use three microscope objectives - the Mitutoyo M Plan
Apo 2X, 5X, and 10X objectives (available from Edmund Optics) - mounted
on a home-made turret. I like these objectives, partly because
they have an extra-long working distance, but they are expensive (about
$600 each). I use the 5X most of the time, the 2X when the
crystals are large, and the 10X only rarely.
The camera and objectives are separated by a length of
rigid tubing, which is baffled to cut down on scattered light.
(There is also a lens mounted inside this tube above the objectives,
which is a bit of a technical detail. The objectives are
infinity-corrected, so a lens is needed to keep focus when I rotate the
turret.)
The snowflake is placed on a platform attached to a
translation stage for focusing. As is typical for microscopes, it
is more convenient to move the subject than to move the lens. I
attached a flexible shaft and a large knob to the stage, making it
easier to focus with cold fingers.
To illuminate the crystals, I use a lamp mounted below
the crystal, as shown in the diagram. Above the lamp is a
heat-rejection filter and a piece of ground glass (not shown), and on
top of those components I can place any of a number of color filters.
The field lens focuses the color filter onto the microscope objective
(so the filter sits at a pupil). What this does is discussed
below.
A number of
people have asked me to share the design drawings for my hardware, so
they can copy this set-up. While I would like to oblige, I really
don't have machine drawings or a parts list, at least not in a form that
would do anyone much good. Projects like this tend to be
build-as-you-go, trying different things to see what gives the best
pictures. It would be quite time-consuming to document every nut
and bolt in the system, so I haven't. Instead, I put together the
do-it-yourself kit in the previous section, which is almost as good for
a lot less money. |
| Illumination
Techniques |
| Snow
crystals are made of ice, which is clear and colorless. I like to
illuminate the crystals with colored lights from behind the crystal,
using the optical layout shown above. The snow crystal then acts
like a complex lens that refracts the different colors in different
directions, producing a variety of colorful effects. |
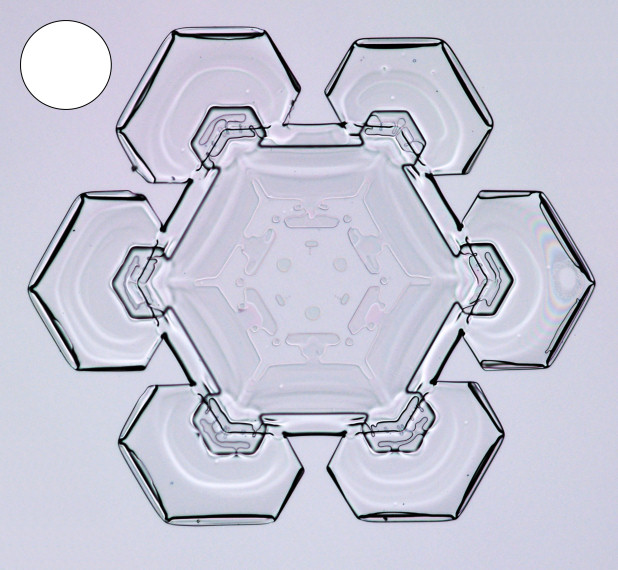
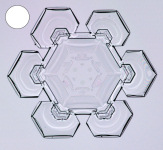 For example, consider the snowflake picture at right. The inset
shows the color filter used in the optical layout shown above. The
inset is a plain white circle, which means that no color filter was
used; plain white light was used to illuminate the crystal from behind.
You can see that the picture is quite bland and colorless. It also
looks "flat" -- the photo has little depth.
For example, consider the snowflake picture at right. The inset
shows the color filter used in the optical layout shown above. The
inset is a plain white circle, which means that no color filter was
used; plain white light was used to illuminate the crystal from behind.
You can see that the picture is quite bland and colorless. It also
looks "flat" -- the photo has little depth.
|
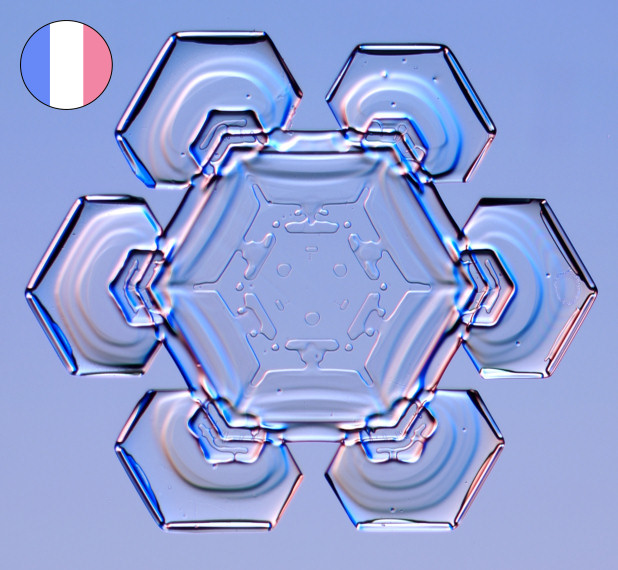
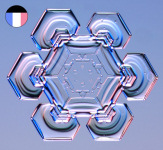
 Compare with the photograph at left, which shows the same snow crystal
using a different color filter. Again the inset shows the color
filter inserted into the optical layout above. Now the picture has
some color, and the crystal has some depth. The bright and dark
highlights accentuate the structure of the crystal. Its subtle
surface patterns are more visible as well.
Compare with the photograph at left, which shows the same snow crystal
using a different color filter. Again the inset shows the color
filter inserted into the optical layout above. Now the picture has
some color, and the crystal has some depth. The bright and dark
highlights accentuate the structure of the crystal. Its subtle
surface patterns are more visible as well.
If you study the optical layout above, you can figure
out what the color filter is doing. With the filter shown, blue
light strikes the crystal at an angle, while red light illuminates it
from a different angle (you have to study the diagram -- trace the
different rays -- to see this). White light hits the crystal from
the center.
Note that all the colors illuminate the entire crystal
(again, study the diagram). Thus the background is a uniform
color. The different colors strike the crystal from different
angles, and this is the key. |
 The crystal at right is more of the same, with a slightly different
color filter (shown in the inset). The dark band means the crystal
is being illuminated more from one side, which increases the sense of
depth.
The crystal at right is more of the same, with a slightly different
color filter (shown in the inset). The dark band means the crystal
is being illuminated more from one side, which increases the sense of
depth. |
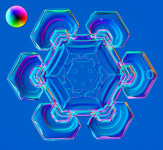 Finally we have the photograph at left, which is again the same snow
crystal using an exotic rainbow filter. This filter is dark in the
center, which means most of the light strikes the crystal from oblique
angles. When these oblique rays hit the background areas, they
mostly miss the objective lens altogether, so the background is quite
dark. Rays that strike the crystal can be refracted into the lens,
so the crystal is brighter than the background. This general
technique is called dark-field illumination. By using a rainbow of
colors, the final photograph contains many colors.
Finally we have the photograph at left, which is again the same snow
crystal using an exotic rainbow filter. This filter is dark in the
center, which means most of the light strikes the crystal from oblique
angles. When these oblique rays hit the background areas, they
mostly miss the objective lens altogether, so the background is quite
dark. Rays that strike the crystal can be refracted into the lens,
so the crystal is brighter than the background. This general
technique is called dark-field illumination. By using a rainbow of
colors, the final photograph contains many colors. |
| The point
of all this is to show that illumination matters. You can use the
optical layout shown above, and you can invent different types of
colored filters. Or you can try other schemes -- try some colored
LEDs, perhaps, or use light reflected from the front of the crystal.
Different illumination techniques produce different results, and you are
free to experiment to you heart's content. |
|
|